




Customer Build Story · Virginia
Stone Clad Pizza Oven: A Landscaper’s Mattone Barile Grande Build
He talked about building a backyard pizza oven for years. When he finally did it, he went big: a footer below the frost line, a herringbone firebrick cooking surface, and a granite, fieldstone and river rock finish that looks like it has always been there.

- Built By
- Dave Marciniak
- Location
- Virginia
- Oven Style
- Fire Brick Barrel
- Number of Photos
- 14
- Builder’s Verdict
- “Heck yeah!”
Build Time-Lapse
Watch It Get Built
From a footer dug below the frost line to a stone-clad brick oven glowing at dusk, in about 28 seconds. Press play, or grab the slider and scrub through the build yourself.

Dave Marciniak runs a landscape design-build company in Culpeper, Virginia, and for years he talked about building a pizza oven in his own backyard. His brother had already built two BrickWood ovens, at two different houses, before he finally told Dave to just order what he needed and get it built. Dave did, and the result is one of the most striking stone pizza ovens in our gallery: a Mattone Barile Grande fire brick barrel hidden inside a tower of fieldstone, granite and river rock. Here is how it came together, with plenty of help from Dave.
Step 1 of 7
Why He Chose a Brick Barrel Oven
Dave’s first plan was a classic brick dome, laid one brick at a time with no form. It was a fun challenge on paper, but a little intimidating, and it was not the right shape for how he wanted to cook. His goal was to roast everything, not just pizza, and a barrel vault gives you a longer, rectangular firebrick cooking surface with room for pans, roasts and bread beside the fire.
He also wanted a true brick oven, so a cast refractory oven was out. That left the Mattone Barile and the bigger Mattone Barile Grande. You can guess which one he picked.
“Spinal Tap’s amplifiers are better because they go to 11, so naturally I went with the Mattone Barile Grande.”
Dave Marciniak
- A real fire brick oven
- Room to roast, not just pizza
- Built big, for a crowd
He downloaded the FREE BrickWood plans and started designing. Two changes came first. He wanted the sides of the oven to rise straight up in one plane instead of following the oven’s curve, and he wanted the whole thing closed in with heavy stone except for the opening. That meant a wider slab and a wider base than the plans call for.
From BrickWood he ordered the foam form, the chimney and the ceramic fiber blanket. Everything else came from local suppliers, which is exactly how our plans are set up to save you money. Portland cement and hydrated lime were easy to find. The fire clay took a 90-minute drive to a pottery supply store, and the silica sand turned up at a pool supply store. If you are hunting for materials near you, start with our masonry supply finder and refractory dealer list, and check the full DIY pizza oven materials list.
Step 2 of 7
A Footer Below the Frost Line
The plans call for a reinforced slab at grade. Dave admits he missed that detail and went the landscaper’s route instead: he dug a footer to frost depth, 24 inches down, and built up from there with block. It is more work than you need, but that oven is not going anywhere.
His first two courses were a double row of 8 x 8 x 16 block, stepping in to 12-inch block to give the stone veneer a ledge to sit on. Above that he followed the plans with 8-inch block, wrapped in 4-inch block to get the width he wanted for the stone.
One more smart change: he built a wall inside the wood box, parallel to the back wall and 24 inches in from the opening. As he put it, any firewood stacked deeper than that would live there forever. Now every split is in easy reach.


Step 3 of 7
Pouring and Setting the Hearth Slabs
The hearth is formed and poured in three separate slabs, so it is easier to lift into place. Dave did not have a hard, level surface like a driveway to pour on, and the forms were not quite level. It did not affect how the oven cooks, but he says it led to “a lot of cursing” when it came time to level the three slabs.
Builder tip: pour your hearth slabs on a flat, level surface like a driveway or patio. It will save you a lot of shimming later.
He set the slabs by himself with a mini skid steer and pallet forks, and it took about an hour to pop off the forms and set the hearth. Then came the insulating layer of Portland cement and vermiculite, which he called “dead simple.” He also had vermiculite left over and used it as extra insulation on top of the oven.


Step 4 of 7
The Herringbone Firebrick Cooking Surface (and the Dog)
Next, he mortared in the brick border around the firebrick cooking surface and laid the firebrick cooking surface in a herringbone pattern. Dave prefers red fire brick to yellow, and his local supplier only carried red, so that worked out.
One sand tip from Dave: some bagged all-purpose sand from the big box stores turned out to be ultra-fine, not coarse. If that is all you can find, buy paver sand from the garden center instead.
Laying the herringbone firebrick cooking surface was the fun part, right up until he looked over at the dog mid-swing, hit his thumb with the mallet and ended up in the ER.

Step 5 of 7
Building the Fire Brick Barrel
With the Mattone Barile Grande foam form in place, the fire brick barrel went up fast. The form’s ridges line up every brick, so the vault takes shape course by course. Dave used plenty of refractory mortar (you can also mix your own high-temperature mortar), and he will tell you he used more than he needed. Some squeezed through the joints and shows inside the oven, and the extra mortar also locked the form in tight, so pulling the foam out later took real patience.
“Soak the fire brick. Soak it for HOURS.”
Dave Marciniak
He rented a gas-powered brick saw. It bogged down on dry fire brick but ripped through soaked brick “like butter.” Wear a dust mask when you cut, too.
When the brickwork dried, he wrapped the oven in ceramic fiber blanket, tied it down with chicken wire and started the stucco. The first coat used more mix than he planned. The finish coat went on “like frosting a cake” and buffed up smooth.
How big is the Grande inside? Dave is 6’4” and about 300 pounds, and while clearing out the last of the foam he crawled in almost to his waist. That is a lot of firebrick cooking surface.


Step 6 of 7
Stone, Granite and River Rock
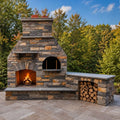
With a photo shoot on the calendar, Dave handed the next part to his crew. They built the blockwork around the oven, parged everything, set the granite front and laid the flat stone veneer. Dave laid the river rock inlay himself. The finished oven reads as one solid piece of stone, with the brick barrel completely hidden inside.

Tap a number to explore the finish
- Stainless chimneyThe chimney from BrickWood vents smoke up and out, well above the stone.
- River rock crownDave laid the river rock inlay himself, all the way over the top and down the sides.
- Granite oven frontA granite face frames the fire brick barrel and its arched opening.
- Bluestone landingA wide stone ledge in front of the opening for sliding pizzas in and out.
- Firewood storageThe wood box below, with a wall 24 inches in so no split gets lost in the back.
- Fieldstone veneerStraight, solid stone sides that hide the barrel shape completely.
This is a great example of why we sell a kit and plans instead of a finished oven. The fire brick barrel inside is the same Mattone Barile Grande you can build, and the outside can be stucco, brick, tile or stone. It is your backyard, so it is your call.


Step 7 of 7
Curing and the First Pizza Night
Dave cured the oven slowly over about a week, with small fires to drive the moisture out of the brick and mortar. He is not a patient person, but he stuck with it, and his oven has not cracked. Our guide to curing a pizza oven walks you through every fire.
For the first cook, he kept it simple: basic pizza dough, passata and grocery store mozzarella, so a learning-curve pizza would not waste fancy ingredients. An infrared thermometer was his best tool. It showed him which parts of the oven heated first, what held heat, and how fast each spot cooled as he moved the fire.
A big oven like the Grande burns through some firewood on the way up to temperature, so read up on the best firewood for pizza ovens. A pizza oven door and a chimney damper help an oven hold its heat for hours after the fire dies down.


 Build DayFinished
Drag across the photo (or just move your mouse) to go from fresh-poured hearth slabs to a finished stone oven at dusk.
Was it worth building a BrickWood Ovens pizza oven? I’d say, resoundingly, heck yeah!
Dave Marciniak · Virginia
Good Questions
Stone Clad Pizza Oven FAQ
How long do you cure a new brick pizza oven?
Plan on about a week of small, gradually bigger fires to drive the moisture out. Skip it and the oven can crack. See our pizza oven curing guide for the full schedule.
Do I need masonry experience to build one?
No. Dave runs a landscape company, but his own advice is that if you are even moderately handy, you can build a brick pizza oven for a lot less than the cost of a drop-in kit. The foam form lines up every brick, and the FREE plans walk you through each step. Still unsure? Read how hard it is to build a pizza oven.
What is the difference between the Mattone Barile and the Mattone Barile Grande?
The Grande is the larger version of the Mattone Barile, with a bigger firebrick cooking surface and an 18.5-inch interior ceiling, built from 190 full-size fire bricks. It is made for big families and big parties. Compare every BrickWood kit to find your fit.
What did Dave buy from BrickWood, and what did he buy locally?
He bought the foam form, chimney and ceramic fiber blanket from BrickWood, and sourced the block, concrete, fire brick and mortar ingredients locally. Our materials list shows exactly what you need for each oven.
Can I finish my oven in stone like this one?
Yes. Every BrickWood oven gets a shell of insulation and stucco, and from there you can leave it as is or cover it in brick, tile or natural stone veneer like Dave did, which gives you an outdoor stone pizza oven like this one. Browse more finishes in our customer photo gallery.
In His Own Words
Dave Marciniak · Virginia
I felt like the styrofoam form from BrickWood Ovens was fairly priced, and made the build pretty easy. Honestly, I wouldn’t have saved much money had I built a form myself out of plywood, and this was way simpler.
BrickWood Ovens kits are great for DIYers, no question. If you’re even moderately handy you can build a pizza oven for a lot less than the cost of one of those drop-in kits.
Great pizza starts at home.
Your Turn
Build One for Your Family
Dave’s oven shows how far you can take a BrickWood oven, and every one starts with the same kit and plans. Start with our free pizza oven plans and materials list, then pick the Mattone Barile Grande pizza oven kit that fits your backyard and make it yours. Not sure which one? Compare all of our pizza oven kits.


