




How to Build an Outdoor Fireplace: The Grunick Family's Stone Fireplace and Oven
A gray stone outdoor fireplace and a firebrick barrel oven, built side by side on one block base at the edge of an Ohio field. Here is every stage, from the first block to the first pizza.

- Built By
- The Grunick Family
- Location
- Ohio
- Oven Style
- Fire Brick Barrel
- Photos & Videos
- 31 Photos
- Homeowner Review
- ★★★★★
Build Time-Lapse
Watch This Outdoor Fireplace and Oven Get Built
From a cinder block base to fires in the fireplace and the oven, in about 60 seconds. Press play, or grab the slider and scrub through the build yourself.

If you are wondering how to build an outdoor fireplace, this Ohio build shows every stage. The Grunick family built a stone fireplace and a Mattone Barile firebrick barrel oven side by side on one block base, then wrapped both in gray split-face stone. In their words: “This project took several weeks to complete. The results are very impressive and worth taking your time to do it right.” Here is how it came together, photo by photo.
Step 1 of 9
Step 1: Lay the Block Base for the Fireplace and Oven
It all starts with concrete block. The Grunick family laid one long block base at the edge of a field: a raised fireplace on the left and an oven stand on the right. Wood arch forms shaped the openings for the fireplace and for the firewood bay under the oven.


Step 2 of 9
Step 2: Cast the Hearth Slabs and Set Them on the Base
Instead of pouring the hearth in place, the slabs were cast in wood forms in the garage, with rebar set inside each one. Once cured, they were carried out and set on top of the block fireplace and oven stand.


Step 3 of 9
Step 3: Insulate the Hearth and Parge the Block
The oven hearth has a recessed center. Insulation board went in first, then a layer of insulating concrete, so the heat stays in the oven instead of soaking into the base. The block walls of the outdoor fireplace got a coat of parging mortar.


Step 4 of 9
Step 4: Line the Fireplace Firebox With Firebrick
The fireplace opening was lined with firebrick, top to bottom. This is the part of an outdoor fireplace that takes the flames, so it has to be firebrick, not regular brick.

Step 5 of 9
Step 5: Lay the Firebrick Cooking Surface
A gray brick border went around the insulated hearth, then a leveling sand bed inside it. The firebrick cooking surface went down in a herringbone pattern, tapped into place with a rubber mallet.


Step 6 of 9
Step 6: Build the Firebrick Barrel Over the Foam Form
The Mattone Barile foam form set the shape. The ridges on the form guide each course of firebrick and mortar, and each row was left to set up before the next went on top. Then the firebrick oven chimney went up at the front.


Step 7 of 9
Step 7: Wrap It in Ceramic Fiber Blanket and Pull the Form
A ceramic fiber blanket went over the whole firebrick barrel, held down with chicken wire, then a coat of mortar over that. With the shell hard, the foam form came out through the oven opening in pieces, leaving a clean firebrick barrel inside.


Step 8 of 9
Step 8: Finish the Fireplace and Oven in Stone Veneer
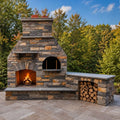
Gray split-face stone veneer wrapped everything: the base, the firewood arch, the face of the outdoor fireplace and the barrel oven itself. Both chimneys were finished in stone too.


Step 9 of 9
Step 9: Light the First Fire and Bake
Fire in the oven, fire in the fireplace, firewood stacked below, all on a new paver pad. Then came the first pizza: spinach, olives and red peppers, straight off the firebrick cooking surface.


Hover over the dots (or tap them on your phone) to see what makes this outdoor fireplace and oven one of a kind.
- Two Chimney CapsStainless caps top separate stone chimneys for the fireplace and the oven.
- Stone Arch FireplaceA stone arch frames the wood-burning fireplace.
- Firebrick FireboxThe fireplace opening is lined with firebrick, floor to ceiling.
- Barrel Oven DoorA black door with wood handles in a stone arch.
- Brick Hearth BorderGray brick frames the oven's firebrick cooking surface.
- Firewood BaySplit firewood stored right under the oven.
- Stone Hearth SeatA cut stone cap at the end of the hearth makes a seat.
- Paver PadThe whole build sits on a new paver pad.

 BeforeFinished
Drag across the photo (or just move your mouse) to go from a cinder block base to the finished stone fireplace and oven.
Plan Yours
Outdoor Fireplace Building Tips From This Build
Build one base for both fires. One long block base holds the fireplace and the oven stand, so they finish as one piece. See more outdoor fireplace with pizza oven builds.
Cast the hearth slabs ahead of time. Casting the slabs in the garage let them cure while the block went up, and it kept the wet work out of the weather.
Insulate under the oven. Insulation board and insulating concrete under the firebrick cooking surface keep the heat where you cook.
Let each row set up. In the Grunicks' words, the trick is letting each row of firebrick set up before putting the weight of the next row on top.
Stone it last. Block, firebrick and insulation do the work. The stone veneer is the finish that goes over all of it. For another stone fireplace and oven combo, see this stacked stone fireplace build.
Good Questions
How to Build an Outdoor Fireplace: FAQ
How do you build an outdoor fireplace?
Build a concrete block base, cap it with a hearth slab, line the firebox with firebrick, then finish the outside in stone veneer or another facing. The Grunick family did exactly that, and built a pizza oven into the same base beside it.
Does an outdoor fireplace need firebrick?
The firebox does. Anywhere the flames touch should be firebrick set in refractory mortar. The Grunicks lined their whole fireplace opening with firebrick and used regular block and stone everywhere else.
Can you build a pizza oven next to an outdoor fireplace?
Yes. The Grunicks built one long block base with the fireplace on one side and the oven stand on the other, then gave each fire its own chimney and wrapped both in the same stone veneer. See more outdoor fireplace with pizza oven builds.
How long does it take to build an outdoor fireplace and oven?
The Grunick family said their project took several weeks to complete, and that the results were worth taking the time to do it right.
Which oven kit did the Grunick family use?
They built a firebrick barrel over the Mattone Barile foam form and insulated it with a ceramic fiber blanket. The Mattone Barile packages add the blanket, chimney kit and more.
How long do you cure a new pizza oven?
Plan on about a week of small, gradually bigger fires to drive the moisture out. Skip it and the oven can crack. See our pizza oven curing guide for the full schedule.
In Their Own Words
The Grunick Family · Ohio★★★★★
I used the Mattone Barile form with a ceramic blanket. Without the form it would be impossible to get the exact barrel shape for this pizza oven. The ridges on the foam form guide each mortar and firebrick placement. The trick is letting each row set-up before placing the weight of the next row on top. Take your time and work carefully to make a professional look on a great pizza oven.
Your Turn
Build Your Own Outdoor Fireplace and Oven
The Grunick family turned the edge of an Ohio field into a stone outdoor fireplace and pizza oven, one stage at a time. Every one starts with the same kit and plans. Start with our free plans and materials list, then finish it your way. Ready to start? See the Mattone Barile kits, or compare all of our pizza oven kits.


