




Tiled Pizza Oven: The Cook Family's Slate Tile Cortile Barile
A tiled pizza oven, start to finish. A Washington family cast a Cortile Barile, set it on a cinder block stand and covered the oven and its base in slate tile, with a patterned tile arch and a brick hearth trim. Here is how it came together, step by step.

- Built By
- The Cook Family
- Location
- Washington
- Oven Style
- Castable Refractory Barrel
- Photos & Videos
- 26 Photos
- Homeowner Review
- ★★★★★
Build Time-Lapse
Watch This Tiled Cortile Barile Come Together
From a cleared spot by the fire pit to a slate tile oven, in about 52 seconds. Press play, or grab the slider and scrub through the build yourself.

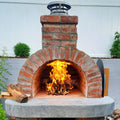
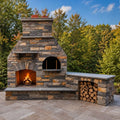
This tiled pizza oven is slate from top to bottom. The Cook family cast their Cortile Barile in the garage, set the castable refractory barrel on a cinder block stand beside the family fire pit, then covered the stand and the oven in slate tile. A patterned tile arch frames the opening, and a row of brick trims the hearth. Here is how the Cooks did it, photo by photo.
Step 1 of 6
Step 1: Clear the Site and Pour the Pad
A spot was cleared beside the family's stone fire pit, and a small concrete pad went down for the oven stand. Cinder blocks and concrete mix were stacked and ready.


Step 2 of 6
Step 2: Precast the Hearth Slabs
Instead of pouring the hearth on top of the stand, the hearth slabs were cast in wood forms on the driveway, with insulation board set into the forms. They cured under plastic, then came out of the forms in three pieces.


Step 3 of 6
Step 3: Cast the Cortile Barile
The Cortile Barile foam molds were filled with castable refractory in the garage. Once the pieces cured, they were dry-fit into the barrel, with the flue opening on top.


Step 4 of 6
Step 4: Build the Stand, Set the Hearth and Tile the Base
The cinder block stand went up around an open bay for firewood, and the precast hearth slabs were set on top. Slate tile went on the sides, a brick trim went around the hearth, and the cast arch pieces were set in place.


Step 5 of 6
Step 5: Set the Oven, Insulate and Wrap It
The cast barrel went together on the hearth over the firebrick cooking surface, with a stainless exhaust pipe on top. Ceramic fiber blanket wrapped the barrel, wire mesh went over the blanket, and a base coat was troweled over the mesh.


Step 6 of 6
Step 6: The Finished Tiled Oven
Slate tile covers the barrel to match the base, a patterned tile arch frames the opening, and the brick trim ties it all together. Firewood stays dry in the bay below.


Hover over the dots (or tap them on your phone) to see what makes this tiled oven one of a kind.
- Stainless Chimney CapA stainless chimney cap tops the exhaust pipe.
- Slate Tile BarrelSlate tile covers the castable refractory barrel.
- Patterned Tile ArchBlack and white patterned tile frames the oven opening.
- Large Tile FrontLarge slate tiles finish the front of the barrel.
- Brick Hearth TrimA row of brick trims the edge of the hearth.
- Precast Hearth SlabThe hearth slabs were cast ahead of time and set on the stand.
- Slate Tile BaseSlate tile covers the cinder block stand to match the oven.

 BeforeFinished
Drag across the photo (or just move your mouse) to go from a cleared spot by the fire pit to the finished tiled oven.
Plan Yours
Tiled Pizza Oven Ideas From This Build
Insulate before you tile. The tile goes on last. Ceramic fiber blanket, wire mesh and a base coat come first, so the tile has a solid surface to stick to.
Cast the heavy parts ahead of time. The Cooks poured their hearth slabs and cast their oven pieces in the garage, then set them on the stand. It keeps the messy work off the finished site.
Match the oven to the base. Slate tile on both the stand and the barrel makes the whole oven look like one piece. A brick trim around the hearth breaks it up.
Frame the opening. A contrasting tile around the arch, like the Cooks' black and white pattern, gives a tiled oven a focal point. For a mosaic take, see this sea-glass mosaic oven.
Put it near the fire pit. Setting the oven beside an existing fire pit turns one spot of the yard into the place everyone gathers.
Good Questions
Tiled Pizza Oven FAQ
What is a tiled pizza oven?
A wood-fired oven finished with tile over its insulation. The Cooks covered their castable refractory barrel and its stand in slate tile, with a patterned tile arch around the opening.
How do you tile a pizza oven?
Insulate first, then tile. The Cooks wrapped the oven in ceramic fiber blanket, covered it with wire mesh and a base coat, then set slate tile over the top and down the stand.
What tile did the Cook family use?
Natural slate tile on the barrel and the stand, a black and white patterned tile around the arch, and a row of brick trimming the hearth.
Which oven kit did the Cook family use?
A Cortile Barile, Package 2. The Cortile Barile uses foam molds that you fill with castable refractory to make the oven pieces. Compare all of our Cortile Barile kits.
Is the Cortile Barile a barrel or a dome?
A barrel. The Cortile Barile is a castable refractory barrel vault, not a dome.
How long do you cure a new pizza oven?
Plan on about a week of small, gradually bigger fires to drive the moisture out. Skip it and the oven can crack. See our pizza oven curing guide for the full schedule.
Your Turn
Build Your Own Tiled Pizza Oven
The Cook family turned a cleared spot by the fire pit into a slate tiled pizza oven. Every one starts with the same kit and plans. Start with our free plans and materials list, then finish it your way. Ready to start? See Cortile Barile · Package 2, or compare all of our pizza oven kits.


