




Stone Veneer Installation: The Schwartz Family’s Cottage-Style Oven House
An Illinois family wrapped their Cortile Barile in a cottage-style house of limestone veneer, with red brick arches, a brick chimney and two firewood bays. Every step is here, in 27 photos.

- Built By
- The Schwartz Family
- Location
- Illinois
- Oven Style
- Castable Refractory Barrel
- Photos & Videos
- 27 Photos
- Homeowner Review
- ★★★★★
Build Time-Lapse
Watch the Stone Veneer Go On, Course by Course
From a block base to a finished stone cottage, in about 54 seconds. Press play, or grab the slider and scrub through the build yourself.

Most of our customers finish their oven with stucco, brick or a little stone. The Schwartz family in Illinois went all the way: they built a cottage-style house of limestone veneer around their Cortile Barile, gable roof and all. If you are planning a stone veneer installation on an outdoor oven, this build shows how to install stone veneer from bare block to the last stone.
Step 1 of 6
A Block Base Built Ready for Stone
The base went up in split-face concrete block on a concrete pad, with openings left for two firewood bays and a side counter. Look closely and you can see the first step in stone veneer installation: metal wall ties set into the mortar joints of every course. Later, those ties get bedded into the stone joints so the veneer is anchored to the block. A young helper was on the job from the first course.


Step 2 of 6
Casting the Cortile Barile
The oven is a Cortile Barile · Package 2, cast in castable refractory from our foam forms. Here the cast front and barrel sections are dry-fit with the stainless flue and chimney cap before they head out to the base.


Step 3 of 6
Insulate, Shell, Then Fire It
On the hearth slab, the barrel was wrapped in ceramic fiber blanket and wire, then covered with a cement shell. That insulation layer is what keeps the heat in the oven and off the stone later. A curing fire went in before any stone went on.


Step 4 of 6
Stone Veneer Installation Around the Oven
This is where the oven turned into a cottage. Limestone veneer went on the base, the side counter and a square enclosure around the insulated oven, with red brick arches over the oven opening and both firewood bays, a brick chimney and a diamond medallion in the back gable. Here is what the photos show, step by step:
- Tie it to the block. Set metal wall ties in the block joints as you build, so every few courses of stone have something to grab.
- Lay it out first. Sort the stone on the lawn by size and shape before you mix any mortar. It makes picking the next piece much faster.
- Cut with a wet saw. Trim pieces to fit, and cut clean corner pieces so the stone wraps the edges.
- Start at the corners and work level. Set each course in mortar, bed the ties into the joints and stagger the vertical joints so no seam runs straight up the wall.
- Frame the openings in brick. Build the brick arches over the oven and firewood bays as the stone rises around them.
- Use scaffolding for the tall parts. The gable, chimney and roof line went up from a scaffold with a crew on the boards.


Step 5 of 6
Firewood Bays and the First Cook
Two brick-arched bays under the oven hold the firewood, one big and one small. The family dog and one of the crew both had to try them out. Then a covered roasting pan went in beside the fire on the firebrick cooking surface.


Step 6 of 6
The Finished Stone Cottage
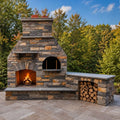
The finished oven house has a stone slab gable roof, the red brick chimney, the diamond medallion on the back and a long limestone counter on the side. It is a big project, and it shows: the whole thing reads like a little stone cottage in the yard.
“We love our BrickWood oven & so does all our family and friends! Thank you!”
The Schwartz Family


Hover over the dots (or tap them on your phone) to see how this stone veneer oven house comes together.
- Chimney CapA stainless cap on top of the flue that runs up through the brick chimney.
- Red Brick ChimneyBuilt from the scaffold around the stainless flue.
- Limestone VeneerCut limestone over the insulated oven enclosure, anchored with wall ties.
- Brick Oven ArchA red brick arch frames the Cortile Barile opening.
- Stone Hearth LedgeA stone landing in front of the oven for pans and peels.
- Side CounterAn extended prep counter capped in stone.
- Big Firewood BayA brick-arched bay under the oven for split wood.
- Small Firewood BayA second bay under the side counter for kindling.

 BeforeFinished
Drag across the photo (or just move your mouse) to go from bare block and cement to the finished stone cottage.
Good Questions
Stone Veneer Installation FAQ
What is stone veneer?
Stone veneer is a layer of real or manufactured stone that covers a wall built from something else, like concrete block. On this build, cut limestone covers a split-face block base and the enclosure around the oven, with red brick used for the arches and chimney.
How do you install stone veneer on a concrete block base?
Build the block walls with metal wall ties set in the mortar joints, as the Schwartz family did. Lay the stone out on the ground first, cut pieces to fit with a wet saw, then set each course in mortar, starting at the corners and bedding the ties into the joints so the stone is anchored to the block. Stagger the vertical joints from course to course and clean off mortar smears while they are fresh.
Can you put stone veneer on a pizza oven?
Yes, on the enclosure around it. The oven itself is insulated first with ceramic fiber blanket, then covered with a shell, and the stone goes on the outside of that. The stone is a finish, not part of the cooking chamber.
Which BrickWood kit is under all that stone?
A Cortile Barile · Package 2. It is a castable refractory barrel that you cast from our foam forms, which is why the family could build a full square stone house around it.
Do I need masonry experience to build one?
No. Our FREE plans walk you through every step of the oven. A stone house this size is a large project, so plan for help: this family had a young helper on the block base and a crew on the scaffold for the stone and brick.
In Their Own Words
The Schwartz Family · Illinois★★★★★
This was best purchase we made. The kit was very easy to assemble and we are enjoying our oven with all our friends and family. Definitely would recommend this product if you are in the market for a wood fire oven.
We love our BrickWood Oven… and so do all our family, friends and neighbors. We have made over 100 pizzas already!
Your Turn
Build Your Own Stone Oven House
Under all that limestone is the same kit and plans every BrickWood oven starts with. Start with our free plans and materials list, then finish it your way. Ready to start? See Cortile Barile · Package 2, or compare all of our pizza oven kits.


