




Terracotta Pizza Oven: The Eichler-Bailey Family's Cast Cortile Barile With Three Brass Fish
A Florida family cast a Cortile Barile, finished it in terracotta stucco and crowned it with three brass fish. Every step is here, in 19 photos.

- Built By
- The Eichler-Bailey Family
- Location
- Florida
- Oven Style
- Castable Refractory Barrel
- Photos & Videos
- 19 Photos
- Homeowner Review
- ★★★★★
Build Time-Lapse
Watch This Terracotta Pizza Oven Get Built
From a bare garden footing to a fire in the terracotta oven, in about 38 seconds. Press play, or grab the slider and scrub through the build yourself.

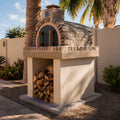
This terracotta pizza oven sits in a shady side-yard garden in Florida, between a yellow shed, a stand of bamboo and an old tree. The Eichler-Bailey family built it by the book with our plans, cast the oven themselves, then gave it a warm terracotta finish and three brass fish. Here is how it came together.
Step 1 of 7
A Footing and a Block Stand
The build started with a footing laid out in the mulched garden, with rebar standing up to tie it to the stand. Concrete block walls went up from there, leaving an open bay in the middle for firewood.


Step 2 of 7
Pouring the Hearth Slab
A wood form went on top of the block walls and the concrete hearth slab was poured in place. Once the form came off, an insulating layer was added on top and left to cure under plastic, and the block walls were parged smooth.


Step 3 of 7
Casting the Cortile Barile
Back in the garage, castable refractory was poured into the Cortile Barile foam forms and left to cure. When the forms come off, you have the cast pieces of the oven, ready to set on the hearth.

Step 4 of 7
Brick Edge and Firebrick Cooking Surface
A border of reclaimed brick went around the insulated center of the hearth. Inside it, firebricks were laid in a herringbone pattern to make the firebrick cooking surface.


Step 5 of 7
Setting the Barrel
The stand got a coat of cream stucco, and the cast barrel pieces were set on the firebrick cooking surface and joined into one barrel. A fish accent on the side of the stand hinted at what was coming.


Step 6 of 7
Stucco and the Terracotta Finish
A ceramic fiber blanket and chicken wire went over the barrel, with the stainless flue in place. Then came a gray coat of stucco, a smooth finish coat and the warm terracotta color that gives this oven its look. Three brass fish went over the opening to finish it.


Step 7 of 7
First Fire and Pizza Night
With firewood stacked in the bay below, the first fire went in. Pizza came next, and then just about everything else.
“The saying is true - Everything tastes better coming out of a wood-fired oven!”
The Eichler-Bailey Family


Hover over the dots (or tap them on your phone) to see what makes this terracotta pizza oven work.
- Stainless FlueA stainless flue and cap carry the smoke up and out of the barrel.
- Three Brass FishThree brass fish over the opening, a perfect touch for a Florida garden.
- Terracotta Stucco FinishStucco over insulation and chicken wire, finished in a warm terracotta color. No clay needed.
- Cast Arch OpeningThe Cortile Barile front piece, cast in our foam form.
- Reclaimed Brick EdgeOld brick frames the hearth and the firebrick cooking surface.
- Concrete Hearth SlabA poured slab with an insulating layer, finished in cream stucco to match the stand.
- Firewood BayThe open bay under the hearth keeps the split firewood dry and close.
- Fish AccentOne more fish on the side of the stand ties it all together.

 BeforeFinished
Drag across the photo (or just move your mouse) to go from bare concrete block to the finished terracotta oven.
Good Questions
Terracotta Pizza Oven FAQ
Is this a real terracotta pizza oven?
Not clay. It is a Cortile Barile cast from castable refractory, covered with a ceramic fiber blanket, chicken wire and stucco, then finished in a terracotta color. You get the warm terracotta look on an oven made for the heat of a wood fire.
Why cast an oven instead of using a clay terracotta oven?
Castable refractory is made to take hot wood fires again and again. The terracotta part is only the finish, so you can pick any color you like and keep the strength of a cast oven underneath.
What is the Cortile Barile?
Our castable refractory barrel oven. You pour castable refractory into our foam forms, let it cure, then set the cast pieces on your hearth. See the Cortile Barile kits. It feeds about 1 to 14 guests and is one of our easiest builds.
What is under the oven?
A concrete block stand on a footing, a poured concrete hearth slab with an insulating layer, a reclaimed brick edge and a herringbone firebrick cooking surface. The open bay below holds the firewood.
What do they cook in it?
Pizza, flatbread, roasted vegetables, ribs, chicken wings, dessert tarts, fish and more.
Do I need masonry experience?
No. Our FREE plans walk you through every step, from the footing to the first fire. You can also read how hard it is to build a pizza oven.
In Their Own Words
The Eichler-Bailey Family · Florida★★★★★
We have used our pizza oven to make: pizza, flat bread, roasted vegetables, ribs, chicken wings, dessert tarts, fish and many more items!!!
Everything has come out spectacular and we have been very happy with the performance of our oven! The saying is true - Everything tastes better coming out of a wood-fired oven!
Your Turn
Build Your Own Terracotta Oven
The Eichler-Baileys cast their own oven and picked their own color. Every one starts with the same kit and plans. Start with our free plans and materials list, then finish it your way. Ready to start? See Cortile Barile · Package 1, or compare all of our pizza oven kits.


