


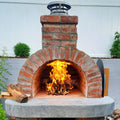

The Gossett Oven
A covered kitchen and bar: the oven is built into a brick wall facing granite bar seating.
Mattone Cupola · Package 3
California · 10 photos
 FREE Pizza Oven Plans
Step-by-step plans and materials lists, emailed to you free
 Mattone BarileFirebrick • Barrel • MediumFrom$229.99
 Best Seller
Mattone Barile GRANDEFirebrick • Barrel • LargeFrom$259.99
 Cortile BarileCastable Refractory • BarrelFrom$699.99
 28" Mattone CupolaCastable Refractory • DomeFrom$999.99
 Fire Pit Grill KitCinder Block Fire Pit with Grill$199.99
 Armageddon OvenDIY Smoker, Brick BBQ & Rotisserie
 Mattone Barilefrom $229.99
 Mattone Barile GRANDEfrom $259.99
 Cortile Barilefrom $699.99
 28" Mattone Cupolafrom $999.99
 BrickWood Exhaust Kitfrom $299.99
 Chimney Damper$199.99
 Chimney Pipe Extension$179.99
 High Temp Silicone$24.99
 Pizza Oven Tool Set$174.99
 Pizza Oven Doorfrom $249.99
 Rope Gasket Kit$39.99
 Hand-Made Pizza Peel$269.99
 White Oak Door Handles$89.99
 Fire Brick$6.99
 Ceramic Fiber Blanketfrom $199.99
 Refractory Mortarfrom $229.99
 Castable Refractory$199.99
 High Heat Mortarfrom $229.94
 Fire Clay$19.99
 Gift Certificatesfrom $10Shop the full store
 How to Cure a Pizza Oven
 Best Wood for a Pizza Oven
 Neapolitan Crust at HomeExplore every Fireside guide
Fireside • Plan It
A wood-fired pizza oven is the best centerpiece an outdoor kitchen can have. Here's how to place it, lay out the counters around it, store the firewood, and budget for the whole thing, with real backyard kitchens built by BrickWood homeowners.

To plan an outdoor kitchen with a pizza oven, place the oven first, where smoke drifts away from the house and seating. Then build the counters around it: landing space beside the oven mouth for hot pans, a prep counter for dough and toppings, and a dry firewood bay underneath. Sinks, fridges and grills come after.
The oven is the heaviest, hottest and most permanent piece in the kitchen, so it sets the layout. Everything else, from the sink to the bar stools, should make it easy to get pizzas in and out of the fire and keep the cook in the conversation.
Put the pizza oven where the smoke drifts away from the house and the seating, the oven mouth faces your guests, and the ground can carry a heavy masonry oven on its own concrete footing. Most homeowners set it at the end of a counter run, in the corner of an L, or in its own wing.
The best outdoor kitchen layout depends on your yard and how many people you cook for. A straight run is the easiest and least expensive to build, an L-shape fits most patios, and a U-shape or island gives serious entertainers the most counter space. A covered pavilion lets you cook in any weather.
| Layout | Best for | Why it works | Watch out for |
|---|---|---|---|
| Straight run | Small yards, along a fence or wall | Easiest and least expensive to build, simple to cover with a roof later | Limited counter space, and the cook faces the wall |
| L-shape | Most patios | Separates the oven and grill zones, room for two cooks, natural corner for seating | The corner of the base takes careful planning |
| U-shape | Big families and frequent parties | The most counter and storage, everything within a step or two | Biggest footprint and cost. Keep the oven on an open side so smoke can escape |
| Island or bar | Social cooks | Guests sit across the counter while you cook | Needs room to walk around it. Keep bar stools away from the oven mouth |
| Covered pavilion | Rain, sun or cold climates | Cook year-round, add lights and fans | The chimney must clear the roof, with safe clearances to the framing. Usually the most expensive |
Whatever shape you choose, keep the oven mouth facing your guests but out of the main walkway. You'll be swinging a long pizza peel in front of it, so leave about 4 feet of open space in front of the oven for the cook. If you can't decide yet, start with a straight run or an L and design it so you can add more counter or a roof later.
Looking for outdoor kitchen ideas to borrow? Our pizza oven ideas gallery has 39 real backyard builds, from covered patios to complete outdoor kitchens.
Plan the counters around how you actually make pizza: stretch the dough, top it, launch it, turn it, pull it, slice it and serve it. That means a landing spot right beside the oven mouth, a prep counter next to that, and a place to cut and serve between the oven and your guests.
| Zone | Where | Guideline |
|---|---|---|
| Landing space | Right beside the oven mouth | 18 to 24 inches of counter on at least one side, for hot pans, peels and finished pizzas |
| Dough and topping prep | Next to the landing space | 36 to 48 inches of counter, room for dough balls, a bench scraper and topping containers |
| Cutting and serving | Between the oven and seating | 24 to 36 inches, close to where your guests sit |
| Grill (optional) | Its own zone, away from the oven | 18 to 24 inches of landing space on each side of the grill |
| Sink and fridge (optional) | Near the prep counter, away from the fire | Plan the water line and drain before the footing is poured |
Standard counters are 36 inches tall and 24 to 30 inches deep, and bar seating is usually 42 inches tall. These are common guidelines, not rules, so fit them to your space and the people cooking. Many builders also extend the hearth slab or add a ledge in front of the oven mouth as a built-in landing spot, like the M. Myers Oven below.
Build a firewood bay into the base right under the oven. It keeps a few fires' worth of wood dry and within reach, and you'll see one in almost every kitchen on this page. Keep the main woodpile somewhere else.
Choose counters and finishes that can take heat, embers and weather. Poured concrete, granite, natural stone, brick and tile over a block base are all good choices. A well-insulated oven stays warm on the outside, not hot, but the area around the oven mouth sees flames, sparks and hot pans.
You can build a pizza oven under a roof, as long as the chimney runs up through and clears the roof, the oven and chimney keep a safe clearance from the framing, and the design meets your local building code. A covered kitchen lets you cook rain or shine, but it takes the most planning.
Our pizza oven chimney guide explains draft, dampers and smoke in more detail. The Gossett kitchen below is a great example of a fully covered oven and bar.
Decide on every utility before you pour the footing, because water lines, drains and electrical conduit are far easier to run first than to cut in later. Hire licensed professionals for the electrical, plumbing and gas work, and pull the permits your town requires.
An outdoor kitchen's cost depends mostly on its size, the appliances, whether it has a roof, and how much of the work you do yourself. A DIY pizza oven with simple block and concrete counters sits at the budget end. Add appliances, a roof and hired trades, and the total can run many times higher.
| Cost driver | What moves the price | How to save |
|---|---|---|
| Pizza oven | Oven size and kit package | Build it yourself from a BrickWood oven kit |
| Footing, base and hearth slab | Concrete, concrete block and rebar | Price them locally with the free plans' materials list |
| Counters | Poured concrete costs the least. Tile, natural stone and granite cost more | Pour concrete counters yourself |
| Appliances | Sink, fridge, grill, side burner | Leave the space and conduit now, add them later |
| Roof or pavilion | Often the biggest single cost | Start uncovered and design the layout so a roof can be added later |
| Utilities | Electrician, plumber and gas fitter | Group the trades into as few visits as possible |
| Labor | DIY or a hired mason or contractor | DIY the oven and base, hire out the utilities |
To get a real number for your backyard, start with the oven. The free pizza oven plans include a complete materials list for every BrickWood oven and its base, and our pizza oven materials list shows what to buy and where to save. Financing is available if you'd like to pay over time.
These homeowners built their own pizza oven outdoor kitchens from BrickWood kits. Each one shows a different way to handle landing space, storage and seating, and every card links to the full build gallery.
A covered kitchen and bar: the oven is built into a brick wall facing granite bar seating.
Mattone Cupola · Package 3
California · 10 photos

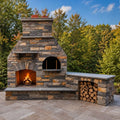
The oven sits in the middle of a straight run, with prep counters and firewood bays on both sides.
Mattone Barile Grande · Package 3
Nebraska · 58 photos

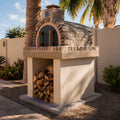
A stone and stucco wall kitchen, with an outdoor fridge built in right beside the oven.
Cortile Barile · Package 3
New Mexico · 23 photos

A long straight run with a concrete counter and storage cabinets beside a stucco-finished oven.
Mattone Barile · Package 3
Michigan · 62 photos

The oven is centered over a stone veneer base, with granite counters on both sides.
Cortile Barile · Package 2
California · 51 photos + 1 video

A freestanding oven on a new paver patio, with a concrete landing ledge and a firewood bay.
Mattone Barile Grande · Package 3
Illinois · 42 photos
Pick the oven by how many people you cook for. The Mattone Barile Grande is the entertainer and feeds up to 20, the Mattone Barile is the family size for up to 8, the Cortile Barile heats up fast and feeds up to 14, and the 28" Mattone Cupola is a dome built for high-heat pizza for up to 20.
| Oven | Feeds | Best for |
|---|---|---|
| Mattone Barile Grande | 1 to 20 | Big outdoor kitchens and frequent parties. Its 24" x 41.5" firebrick cooking surface holds three 10" pizzas at once, with room for roasting pans. Our best-selling oven |
| Mattone Barile | 1 to 8 | Family kitchens and tighter runs. The same firebrick barrel design and big opening as the Grande, in a smaller size |
| Cortile Barile | 1 to 14 | A castable refractory barrel that heats up fast. Its 11" tall door suits pizza and skillets better than big roasting pans |
| 28" Mattone Cupola | 1 to 20 | A castable dome built for fast, high-heat pizza |
Still deciding? Our pizza oven size guide compares all four side by side.
Our 8-step build guide walks you through the oven itself.
Yes. A wood-fired pizza oven makes a great outdoor kitchen centerpiece. Place it first, on its own reinforced concrete footing, where smoke drifts away from the house and seating, then build the counters, storage and other appliances around it.
At the end of a counter run, in the corner of an L-shaped kitchen, in the middle of a straight run, or in its own wing. Keep it downwind of the seating, face the oven mouth toward your guests, and keep it out of the main walkway.
As a guideline, plan 18 to 24 inches of landing space beside the oven mouth for hot pans and finished pizzas, plus 36 to 48 inches of prep counter nearby for stretching dough and topping pizzas.
Yes, if the chimney runs up through and clears the roof, the oven and chimney keep a safe clearance from the framing, and the design meets your local building code. High ceilings and open sides help smoke clear.
It depends on the size, the appliances, whether it has a roof, and how much you build yourself. A DIY pizza oven with simple block and concrete counters is the budget end. Appliances, a roof and hired trades raise the total a lot. Price the oven and base locally with the free plans' materials list.
For big gatherings, the Mattone Barile Grande feeds up to 20 and is our best-selling oven. The Mattone Barile feeds up to 8, the Cortile Barile heats up fast and feeds up to 14, and the 28" Mattone Cupola is a dome built for high-heat pizza.

Our free plans show you how to build the oven, its base and hearth slab, with a complete materials list for every BrickWood oven. Lay out your kitchen around it and price the whole build locally before you buy a thing.
Already signed up and don't see them? Check your Spam or Promotions folder.
Not sure which oven fits your outdoor kitchen? Compare Oven Kits →
Counter sizes, clearances and chimney heights here are common guidelines. Always follow the plans for your specific BrickWood model, check permits, setbacks and local building codes before you build, and hire licensed professionals for electrical, plumbing and gas work.


